Hadoop基本操作

Hadoop基本操作

Hadoop Shell基本操作


实验过程及代码:
  1. 打开终端模拟器,启动Hadoop开启相关DataNode、NameNode、SecondaryNameNode、Jps等相关进程。
1
2
3
cd /apps/hadoop/sbin        //切换到/apps/hadoop/sbin目录下
./start-all.sh //启动Hadoop
jps //检查相关进程是否启动
  1. 在Hadoop中创建、修改、查看、删除文件夹test1及文件data.txt。
1
2
3
4
5
6
7
8
9
10
11
12
13
14
15
16
hadoop fs -mkdir /test1               //在/目录下创建一个test1文件夹
hadoop fs -touchz /test1/file.txt //在Hadoop中的test1文件夹中创建一个file.txt文件hadoop fs -ls / //查看根目录下所有文件
hadoop fs -ls -R / //使用ls -R的方式递归查看根下所有文件
hadoop fs -mv /test1/file.txt /file2.txt //将Hadoop根下test1目录中的file.txt文件,移动到根下并重命名为file2.txt
hadoop fs -cp /file2.txt /test1 //将Hadoop根下的file2.txt文件复制到test1目录下
cd /data //切换Linux本地/data目录下
touch data.txt //创建一个data.txt文件
echo hello hadoop! >> data.txt //写入hello hadoop!
hadoop fs -put /data/data.txt /test1 //将Linux本地/data目录下的data.txt文件,上传到HDFS中的/test1目录下
hadoop fs -cat /test1/data.txt //查看Hadoop中/test1目录下的data.txt文件
hadoop fs -tail /test1/data.txt //使用tail方法查看data.txt文件
hadoop fs -du -s /test1/data.txt //查看Hadoop中/test1目录下的data.txt文件大小
hadoop fs -text /test1/data.txt //使用text方法将源文件输出为文本格式
hadoop fs -stat /test1/data.txt //stat方法返回指定路径的统计信息,不指定format时候打印文件创建日期,相当于%y。
hadoop fs -get /test1/data.txt /apps //将Hadoop中/test1目录下的data.txt文件,下载到Linux本地/apps目录中
ls /apps //查看一下/apps目录下是否存在data.txt文件
  1. 使用chown方法,改变Hadoop/test1目录中的data.txt文件拥有者和权限。
1
2
3
4
5
hadoop fs -chown root /test1/data.txt      //使用chown方法,改变Hadoop中/test1目录中的data.txt文件拥有者为root,使用-R将使改变在目录结构下递归进行。
hadoop fs -chmod 777 /test1/data.txt //使用chmod方法,赋予Hadoop中/test1目录中的data.txt文件777权限
hadoop fs -rm /file2.txt //删除Hadoop根下的file2.txt文件
hadoop fs -rm -r /test1 //删除Hadoop根下的test1目录
hadoop fs -expunge //使用expunge方法清空回收站。
  1. 使用Shell命令执行Hadoop自带的WordCount类
1
2
3
4
5
6
7
8
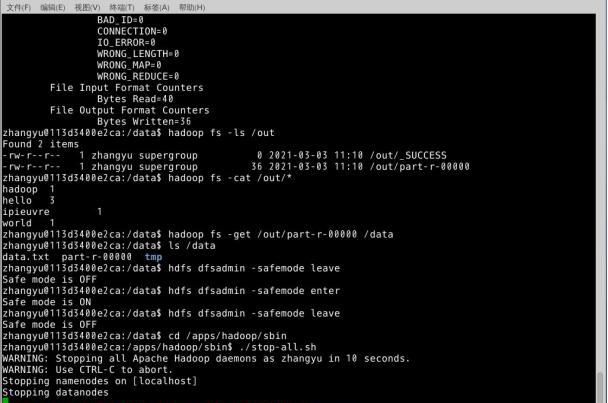
cd /data      //切换到/data目录下
vim data.txt //使用vim编辑一个data.txt文件
hadoop fs -put /data/data.txt /in //在HDFS的根下创建in目录,并将/data下的data.txt文件上传到HDFS中的in目录
hadoop jar /apps/hadoop/share/hadoop/mapreduce/hadoop-mapreduce-examples-3.0.0.jar wordcount /in /out //执行hadoop jar命令,在hadoop的/apps/hadoop/share/hadoop/mapreduce路径下存在hadoop-mapreduce-examples-3.0.0.jar包,执行其中的worldcount类,数据来源为HDFS的/in目录,数据输出到HDFS的/out目录

hadoop fs -ls /out //查看HDFS中的/out目录
hadoop fs -cat /out/*
Hadoop fs - get /out/part-r-00000.txt /data //将HDFS中/out下生成的文件,下载到Linux本地/data目录中
  1. 进入Hadoop安全模式并退出。
1
2
3
4
hdfs dfsadmin -safemode enter    //进入hadoop安全模式
hdfs dfsadmin -safemode leave //退出Hadoop安全模式
cd /apps/hadoop/sbin //切换到/apps/hadoop/sbin目录下
./stop-all.sh //关闭Hadoop

img

HDFS JAVA API


实验过程及代码:
  1. 在终端模拟器启动Hadoop,创建hadoop4目录,下载依赖包并解压到hadoop4目录;
1
2
3
4
5
6
7
8
9
10
11
cd /apps/hadoop/sbin        //切换目录到/apps/hadoop/sbin下,

./start-all.sh //启动hadoop。

mkdir -p /data/hadoop4 //在Linux本地创建/data/hadoop4目录。

cd /data/hadoop4 //切换到/data/hadoop4目录

wget http://59.64.78.41:60000/allfiles/hadoop4/hadoop2lib.tar.gz

tar zxvf hadoop2lib.tar.gz //用wget命令,从http://59.64.78.41:60000/allfiles/hadoop4/网址上下载依赖包hadoop2lib.tar.gz,并解压到当前目录。
  1. 打开Eclipse,新键Java Project,名为hadoop4,新建包my.hdfs,创建目录hadoop4lib存放依赖包,把jar包拷贝并全选,右键点击BuildPath=>Add to Build Path选项加载jar包到项目。

  2. 新建类MakeDir,功能:在HDFS的根目录下,创建名为hdfstest的目录。代码如下:

1
2
3
4
5
6
7
8
9
10
11
12
13
14
15
16
17
18
19
20
21
22
23
package my.hdfs;  
import java.io.IOException;
import java.net.URI;
import java.net.URISyntaxException;
import org.apache.hadoop.conf.Configuration;
import org.apache.hadoop.fs.FileSystem; //FileSystem是一个通用文件系统的抽象基类,可以被分布式文件系统继承
import org.apache.hadoop.fs.Path;

public class MakeDir {
public static void main(String[] args) throws IOException, URISyntaxException {
Configuration conf = new Configuration(); //创建一个Configuration对象时,其构造方法会默认加载工程项目下两个配置文件,分别是hdfs-site.xml以及core-site.xml,这两个文件中会有访问HDFS所需的参数值,主要是fs.defaultFS,指定了HDFS的地址
String hdfsPath = "hdfs://localhost:9000";
FileSystem hdfs = FileSystem.get(new URI(hdfsPath), conf);
String newDir = "/hdfstest";
//声明变量newDir,设置路径
boolean result = hdfs.mkdirs(new Path(newDir));
if (result) {
System.out.println("Success!");
}else {
System.out.println("Failed!");
}
}
}

hadoop fs -ls -R / // //使用ls -R的方式递归查看根下所有文件

  1. 新建类TouchFile,功能:在HDFS的目录/hdfstest下,创建名为touchfile的文件.
1
2
3
4
5
6
7
8
9
10
11
12
13
14
15
16
17
18
19
20
21
package my.hdfs; 
import java.io.IOException;
import java.net.URI;
import java.net.URISyntaxException;
import org.apache.hadoop.conf.Configuration;
import org.apache.hadoop.fs.FSDataOutputStream;
import org.apache.hadoop.fs.FileSystem;
import org.apache.hadoop.fs.Path;

public class TouchFile {
public static void main(String[] args) throws IOException, URISyntaxException {
Configuration configuration = new Configuration(); //创建一个Configuration对象configuration,
String hdfsPath = "hdfs://localhost:9000";
FileSystem hdfs = FileSystem.get(new URI(hdfsPath), configuration); //用文件系统FileSystem声明一个实例hdfs
String filePath = "/hdfstest/touchfile"; //声明变量 filePath表示文件路径
FSDataOutputStream create = hdfs.create(new Path(filePath)); //FSDataOutputStream实例FileSystem返回FSDataOutputStream实例用create(Path p)函数,创建一个空文件,然后可以向该文件顺序写入
System.out.println("Finish!");

}

}

hadoop fs -ls -R / // //使用ls -R的方式递归查看根下所有文件

  1. cd /data/hadoop4 在/data/hadoop4下

vim sample_data //使用vim打开sample_data文件,

使用vim编辑输入a,开启输入模式

hello world //输入hello world

  1. 创建类CopyFromLocalFile.class,功能:将本地linux操作系统上的文件/data/hadoop4/sample_data,上传到HDFS文件系统的/hdfstest目录下。代码如下:
1
2
3
4
5
6
7
8
9
10
11
12
13
14
15
16
17
18
19
20
21
package my.hdfs;  
import java.io.IOException;
import java.net.URI;
import java.net.URISyntaxException;
import org.apache.hadoop.conf.Configuration;
import org.apache.hadoop.fs.FileSystem;
import org.apache.hadoop.fs.Path;
public class CopyToLocalFile {
public static void main(String[] args) throws IOException, URISyntaxException {
Configuration conf = new Configuration(); //声明环境配置变量conf
String hdfsPath = "hdfs://localhost:9000"; //声明URL路径
FileSystem hdfs = FileSystem.get(new URI(hdfsPath), conf);
//用文件系统FileSystem声明一个实例hdfs
String from_HDFS = "/hdfstest/sample_data";
String to_Linux = "/data/hadoop4/copytolocal";
//复制文件路径
hdfs.copyToLocalFile(false, new Path(from_HDFS), new Path(to_Linux));
//copyToLocalFile()方法拷贝文件到本地
System.out.println("Finish!");
}
}
1
2
cd /data/hadoop4/copytolocal //切换路径
ls //查看
  1. 新建类ListFiles,程序功能是列出HDFS文件系统/hdfstest目录下,所有的文件,以及文件的权限、用户组、所属用户。
1
2
3
4
5
6
7
8
9
10
11
12
13
14
15
16
17
18
19
20
21
package my.hdfs; 
import java.io.IOException;
import java.net.URI;
import org.apache.hadoop.conf.Configuration;
import org.apache.hadoop.fs.FileStatus;
import org.apache.hadoop.fs.FileSystem;
import org.apache.hadoop.fs.Path;

public class ListFiles {
public static void main(String[] args) throws IOException {
Configuration conf = new Configuration(); //声明环境变量配置
String hdfspath = "hdfs://localhost:9000/"; //定义文件路径
FileSystem hdfs = FileSystem.get(URI.create(hdfspath), conf);
String watchHDFS = "/hdfstest"; //查看文件的源路径
FileStatus[] files = hdfs.listStatus(new Path(watchHDFS));
for (FileStatus file : files) {
System.out.println(file.getPermission() + " " + file.getOwner()
\+ " " + file.getGroup() + " " + file.getPath());
}
}
}

执行结果:

img

  1. 新建类IteratorListFiles,功能:列出HDFS文件系统/根目录下,以及各级子目录下,所有文件以及文件的权限、用户组,所属用户。
1
2
3
4
5
6
7
8
9
10
11
12
13
14
15
16
17
18
19
20
21
22
23
24
25
26
27
28
29
30
31
32
33
34
package my.hdfs; 

import java.io.FileNotFoundException;
import java.io.IOException;
import java.net.URI;
import org.apache.hadoop.conf.Configuration;
import org.apache.hadoop.fs.FileStatus;
import org.apache.hadoop.fs.FileSystem;
import org.apache.hadoop.fs.Path;

public class IteratorListFiles {
public static void main(String[] args) throws IOException {
Configuration conf = new Configuration(); //声明环境配置变量
String hdfspath = "hdfs://localhost:9000/";
FileSystem hdfs = FileSystem.get(URI.create(hdfspath), conf);
String watchHDFS = "/"; //根目录路径
iteratorListFile(hdfs, new Path(watchHDFS));
}

public static void iteratorListFile(FileSystem hdfs, Path path)
throws FileNotFoundException, IOException {
FileStatus[] files = hdfs.listStatus(path);
for (FileStatus file : files) {
if (file.isDirectory()) {
System.out.println(file.getPermission() + " " + file.getOwner()
\+ " " + file.getGroup() + " " + file.getPath());
iteratorListFile(hdfs, file.getPath());
} else if (file.isFile()) {
System.out.println(file.getPermission() + " " + file.getOwner()
\+ " " + file.getGroup() + " " + file.getPath());
}
}
}
}

img

  1. 新建类LocateFile,功能:查看HDFS文件系统上,文件/hdfstest/sample_data的文件块信息。
1
2
3
4
5
6
7
8
9
10
11
12
13
14
15
16
17
18
19
20
21
22
23
24
25
26
27
28
package my.hdfs;  

import java.io.IOException;
import java.net.URI;
import java.net.URISyntaxException;
import org.apache.hadoop.conf.Configuration;
import org.apache.hadoop.fs.BlockLocation;
import org.apache.hadoop.fs.FileStatus;
import org.apache.hadoop.fs.FileSystem;
import org.apache.hadoop.fs.Path;

public class LocateFile {
public static void main(String[] args) throws IOException, URISyntaxException {
Configuration conf = new Configuration(); //声明环境配置变量conf
String hdfsPath = "hdfs://localhost:9000";
FileSystem hdfs = FileSystem.get(new URI(hdfsPath), conf);
//用文件系统FileSystem声明一个实例,获取文件地址
Path file = new Path("/hdfstest/sample_data"); //用Path变量file表示要打开文件的路径。
FileStatus fileStatus = hdfs.getFileStatus(file); //查看hdfs数据信息FileStatus对象封装了文件的和目录的额元数据,包括文件长度、块大小、权限等信息
BlockLocation[] location = hdfs.getFileBlockLocations(fileStatus, 0, fileStatus.getLen()); ////文件块信息
for (BlockLocation block : location) {
String[] hosts = block.getHosts();
for (String host : hosts) {
System.out.println("block:" +block + " host:"+ host);
}
}
}
}
  1. 新建类WriteFile,功能:在HDFS上,创建/hdfstest/writefile文件并在文件中写入内容“hello world hello data!”。
1
2
3
4
5
6
7
8
9
10
11
12
13
14
15
16
17
18
19
20
21
22
23
24
25
26
package my.hdfs;  

import java.io.IOException;
import java.net.URI;
import org.apache.hadoop.conf.Configuration;
import org.apache.hadoop.fs.FSDataOutputStream;
import org.apache.hadoop.fs.FileSystem;
import org.apache.hadoop.fs.Path;
public class WriteFile {
public static void main(String[] args) throws IOException {
Configuration conf = new Configuration();
//声明环境配置变量conf
String hdfsPath = "hdfs://localhost:9000";
FileSystem hdfs = FileSystem.get(URI.create(hdfsPath), conf); //创建文件路径
String filePath = "/hdfstest/writefile"; //声明文件路径
FSDataOutputStream create = hdfs.create(new Path(filePath));
//创建一个空文件,然后可以向该文件顺序写入, FileSystem中的create()方法返回的是一个输出流FSDataOutputStream对象create
System.out.println("Step 1 Finish!");
//打印Step 1 Finish!
String sayHi = "hello world hello data!";
byte[] buff = sayHi.getBytes();
create.write(buff, 0, buff.length);
create.close();
System.out.println("Step 2 Finish!");
}
}
1
2
3
hadoop fs -ls -R /hdfstest 

hadoop fs -cat /hdfstest/writefile

img

  1. 在linux本地创建/data/hadoop4/testmerge目录。
1
2
3
4
5
mkdir -p /data/hadoop4/testmerge //在linux本地创建/data/hadoop4/testmerge目录。
touch file1 //新建文件file1
touch file2 //新建文件file2
echo "hello file1" > file1 //在file1输入hello file1
echo "hello file2" > file2 //在file2输入hello file2
  1. 新建类PutMerge,功能:将Linux本地文件夹/data/hadoop4/testmerge/下的所有文件,上传到HDFS上并合并成一个文件/hdfstest/mergefile。
1
2
3
4
5
6
7
8
9
10
11
12
13
14
15
16
17
18
19
20
21
22
23
24
25
26
27
28
29
30
31
32
package my.hdfs; 
import java.io.IOException;
import java.net.URI;
import java.net.URISyntaxException;
import org.apache.hadoop.conf.Configuration;
import org.apache.hadoop.fs.FSDataInputStream;
import org.apache.hadoop.fs.FSDataOutputStream;
import org.apache.hadoop.fs.FileStatus;
import org.apache.hadoop.fs.FileSystem;
import org.apache.hadoop.fs.Path;
public class PutMerge {
public static void main(String[] args) throws IOException, URISyntaxException {
Configuration conf = new Configuration(); //声明环境配置变量conf
String hdfsPath = "hdfs://localhost:9000";
FileSystem hdfs = FileSystem.get(new URI(hdfsPath), conf);
FileSystem local = FileSystem.getLocal(conf);
String from_LinuxDir = "/data/hadoop4/testmerge/";
String to_HDFS = "/hdfstest/mergefile";
FileStatus[] inputFiles = local.listStatus(new Path(from_LinuxDir));
FSDataOutputStream out = hdfs.create(new Path(to_HDFS)); //FileSystem中的create()方法返回的是一个输出流FSDataOutputStream对象out
for (FileStatus file : inputFiles) {
FSDataInputStream in = local.open(file.getPath()); //返回的是一个输入流FSDataInputStream对象
byte[] buffer = new byte[256]; //写入文件大小
int bytesRead = 0;
while ( (bytesRead = in.read(buffer) ) > 0) {
out.write(buffer, 0, bytesRead);
}
in.close();
}
System.out.println("Finish!");
}
}
1
hadoop fs -ls /hdfstest 

img

开发YARN客户端应用


实验过程及代码:
  1. 启动hadoop,下载依赖包。
1
2
3
4
5
6
cd /apps/hadoop/sbin      //切换到/apps/hadoop/sbin目录下
./start-all.sh //启动hadoop
mkdir -p /data/yarn //在Linux本地文件系统新建/data/yarn目录。
cd /data/yarn //切换到/data/yarn目录下
wget http://59.64.78.41:60000/allfiles/yarn/hadoop2lib.tar.gz //用wget命令从http://59.64.78.41:60000/allfiles/yarn/hadoop2lib.tar.gz网址上下载项目用到的依赖包。
tar zxvf hadoop2lib.tar.gz hadoop2lib 将hadoop2lib.tar.gz解压到当前目录下。
  1. 添加项目所需的jar包。

  2. 打开Eclipse,新键Java Project,名为YARN,新建包my.yarn,创建目录lib存放依赖包,把jar包拷贝并全选,右键点击BuildPath=>Add to Build Path选项加载jar包到项目。

  3. 新建类,类名为Client。

  • 客户端编写流程

步骤1 Client通过RPC函数ClientRMProtocol.getNewApplication从ResourceManager中获取唯一的application ID

步骤2 Client通过RPC函数ClientRMProtocol#submitApplication将ApplicationMaster提交到ResourceManager上。

主要作用是提交(部署)应用和监控应用运行两个部分

1
2
3
4
5
6
7
8
9
10
11
12
13
14
15
16
17
18
19
20
21
22
23
24
25
26
27
28
29
30
31
32
33
34
35
36
37
38
39
40
41
42
43
44
45
46
47
48
49
50
51
52
53
54
55
56
57
58
59
60
61
62
63
64
65
66
67
68
69
70
71
72
73
74
75
76
77
78
79
80
81
82
83
84
85
86
87
88
89
90
91
92
93
94
95
96
97
98
99
100
101
102
103
104
105
106
107
108
109
110
111
112
113
114
115
116
117
118
119
120
121
122
123
124
125
126
127
128
129
130
131
132
133
134
135
136
137
138
139
140
141
142
143
144
145
146
147
148
149
150
151
package my.yarn;  

import java.io.IOException;
import java.util.HashMap;
import java.util.LinkedList;
import java.util.List;
import java.util.Map;
import org.apache.commons.io.FilenameUtils;
import org.apache.hadoop.conf.Configuration;
import org.apache.hadoop.fs.FileStatus;
import org.apache.hadoop.fs.FileSystem;
import org.apache.hadoop.fs.Path;
import org.apache.hadoop.security.UserGroupInformation;
import org.apache.hadoop.util.ClassUtil;
import org.apache.hadoop.yarn.api.ApplicationConstants;
import org.apache.hadoop.yarn.api.ApplicationConstants.Environment;
import org.apache.hadoop.yarn.api.records.ApplicationId;
import org.apache.hadoop.yarn.api.records.ApplicationReport;
import org.apache.hadoop.yarn.api.records.ApplicationSubmissionContext;
import org.apache.hadoop.yarn.api.records.ContainerLaunchContext;
import org.apache.hadoop.yarn.api.records.LocalResource;
import org.apache.hadoop.yarn.api.records.LocalResourceType;
import org.apache.hadoop.yarn.api.records.LocalResourceVisibility;
import org.apache.hadoop.yarn.api.records.Priority;
import org.apache.hadoop.yarn.api.records.Resource;
import org.apache.hadoop.yarn.client.api.YarnClient;
import org.apache.hadoop.yarn.client.api.YarnClientApplication;
import org.apache.hadoop.yarn.conf.YarnConfiguration;
import org.apache.hadoop.yarn.exceptions.YarnException;
import org.apache.hadoop.yarn.util.ConverterUtils;
import org.apache.log4j.Logger;
public class Client {
static private Logger logger = Logger.getLogger("Client.class");
public static void main(String[] args) throws Exception {
Configuration conf = new Configuration();
if (UserGroupInformation.isSecurityEnabled()) {
throw new Exception("SecurityEnabled , not support");
}
// 1. create and start a yarnClient
YarnClient yarnClient = YarnClient.createYarnClient();
yarnClient.init(conf);
yarnClient.start();
// 2. create an application
YarnClientApplication app = yarnClient.createApplication();
ApplicationSubmissionContext appContext=app.getApplicationSubmissionContext();
ApplicationId appId=appContext.getApplicationId();
appContext.setApplicationName("my.yarn.ApplicationMaster");
appContext.setKeepContainersAcrossApplicationAttempts(false);

// 3. Set the app's resource usage, 100*10MB, 1vCPU
Resource capability = Resource.newInstance(100, 1);
app.getApplicationSubmissionContext().setResource(capability);

// 4. Set the app's localResource env and command by
// ContainerLaunchContext
ContainerLaunchContext amContainer = createAMContainerLanunchContext(
conf, appId);
appContext.setAMContainerSpec(amContainer);
// 5. submit to queue default
app.getApplicationSubmissionContext().setPriority(
Priority.newInstance(0));
app.getApplicationSubmissionContext().setQueue("default");
monitorApplicationReport(yarnClient, appId);
}
private static ContainerLaunchContext createAMContainerLanunchContext(
Configuration conf, ApplicationId appId) throws IOException {

//Add this jar file to hdfs
Map<String, LocalResource> localResources = new HashMap<String, LocalResource>();
FileSystem fs = FileSystem.get(conf);
String thisJar = ClassUtil.findContainingJar(Client.class);
String thisJarBaseName = FilenameUtils.getName(thisJar);
logger.info("thisJar is " + thisJar);
System.out.println("thisJar is "+thisJar);
System.out.println(thisJarBaseName);
addToLocalResources(fs, thisJar, thisJarBaseName, appId.toString(),
localResources);
//Set CLASSPATH environment
Map<String, String> env = new HashMap<String, String>();
StringBuilder classPathEnv = new StringBuilder(
Environment.CLASSPATH.$$());
classPathEnv.append(ApplicationConstants.CLASS_PATH_SEPARATOR);
classPathEnv.append("./*");
for (String c : conf
.getStrings(
YarnConfiguration.YARN_APPLICATION_CLASSPATH,
YarnConfiguration.DEFAULT_YARN_CROSS_PLATFORM_APPLICATION_CLASSPATH)) {
classPathEnv.append(ApplicationConstants.CLASS_PATH_SEPARATOR);
classPathEnv.append(c.trim());
}
if (conf.getBoolean(YarnConfiguration.IS_MINI_YARN_CLUSTER, false)) {
classPathEnv.append(':');
classPathEnv.append(System.getProperty("java.class.path"));
}
env.put(Environment.CLASSPATH.name(), classPathEnv.toString());
//Build the execute command
List<String> commands = new LinkedList<String>();
StringBuilder command = new StringBuilder();
command.append(Environment.JAVA_HOME.$$()).append("/bin/java ");
command.append("-Dlog4j.configuration=container-log4j.properties ");
command.append("-Dyarn.app.container.log.dir=" +
ApplicationConstants.LOG_DIR_EXPANSION_VAR + " ");
command.append("-Dyarn.app.container.log.filesize=0 ");
command.append("-Dhadoop.root.logger=INFO,CLA ");
command.append("my.yarn.ApplicationMaster");
command.append("1>" + ApplicationConstants.LOG_DIR_EXPANSION_VAR + "/stdout ");
command.append("2>" + ApplicationConstants.LOG_DIR_EXPANSION_VAR + "/stderr ");
commands.add(command.toString());

ContainerLaunchContext amContainer = ContainerLaunchContext
.newInstance(localResources, env, commands, null, null, null);
return amContainer;
}
private static void addToLocalResources(FileSystem fs, String fileSrcPath,
String fileDstPath, String appId,
Map<String, LocalResource> localResources)
throws IllegalArgumentException, IOException {
String suffix = "data/YARN" + "/" + appId + "/" + fileDstPath;
System.out.println(fs.getHomeDirectory());
Path dst = new Path(fs.getHomeDirectory(), suffix);
logger.info("hdfs copyFromLocalFile " + fileSrcPath + " =>" + dst);
fs.copyFromLocalFile(new Path(fileSrcPath), dst);
FileStatus scFileStatus = fs.getFileStatus(dst);
LocalResource scRsrc = LocalResource.newInstance(
ConverterUtils.getYarnUrlFromPath(dst), LocalResourceType.FILE,
LocalResourceVisibility.APPLICATION, scFileStatus.getLen(),
scFileStatus.getModificationTime());
localResources.put(fileDstPath, scRsrc);
}
private static void monitorApplicationReport(YarnClient yarnClient, ApplicationId appId) throws YarnException, IOException {
while (true) {
try {
Thread.sleep(5 * 1000);
} catch (InterruptedException e) {
}
ApplicationReport report = yarnClient.getApplicationReport(appId);
logger.info("Got application report " + ", clientToAMToken="
+ report.getClientToAMToken() + ", appDiagnostics="
+ report.getDiagnostics() + ", appMasterHost="
+ report.getHost() + ", appQueue=" + report.getQueue()
+ ", appMasterRpcPort=" + report.getRpcPort()
+ ", appStartTime=" + report.getStartTime()
+ ", yarnAppState="
+ report.getYarnApplicationState().toString()
+ ", distributedFinalState="
+ report.getFinalApplicationStatus().toString()
+ ", appTrackingUrl=" + report.getTrackingUrl()
+ ", appUser=" + report.getUser());
}
}
}
  • 新建类,类名为ApplicationMaster。
1
2
3
4
5
6
7
8
9
10
11
12
13
14
15
16
17
18
19
20
21
22
23
24
25
26
27
28
29
30
31
32
33
34
35
36
37
38
39
40
41
42
43
44
45
46
47
48
49
50
51
52
53
54
55
56
57
58
59
60
61
62
63
64
65
66
67
68
69
70
71
72
73
74
75
76
77
78
79
80
81
82
83
84
85
86
87
88
89
90
91
92
93
94
95
96
97
98
99
100
101
102
103
104
105
106
107
108
109
110
111
112
113
114
115
116
117
118
119
120
121
122
123
124
125
126
127
128
129
130
131
132
133
134
135
136
137
138
139
140
141
142
143
144
145
146
147
148
149
150
151
152
153
154
155
156
157
158
159
160
161
162
163
164
165
166
167
168
169
170
171
172
173
174
175
176
177
178
179
180
181
182
183
184
185
186

package my.yarn;
import java.io.IOException;
import java.nio.ByteBuffer;
import java.util.LinkedList;
import java.util.List;
import java.util.Map;
import java.util.concurrent.ConcurrentHashMap;
import java.util.concurrent.ExecutorService;
import java.util.concurrent.Executors;
import java.util.concurrent.atomic.AtomicInteger;
import org.apache.commons.logging.Log;
import org.apache.commons.logging.LogFactory;
import org.apache.hadoop.conf.Configuration;
import org.apache.hadoop.net.NetUtils;
import org.apache.hadoop.yarn.api.ApplicationConstants;
import org.apache.hadoop.yarn.api.protocolrecords.RegisterApplicationMasterResponse;
import org.apache.hadoop.yarn.api.records.ApplicationAttemptId;
import org.apache.hadoop.yarn.api.records.Container;
import org.apache.hadoop.yarn.api.records.ContainerId;
import org.apache.hadoop.yarn.api.records.ContainerLaunchContext;
import org.apache.hadoop.yarn.api.records.ContainerStatus;
import org.apache.hadoop.yarn.api.records.FinalApplicationStatus;
import org.apache.hadoop.yarn.api.records.NodeReport;
import org.apache.hadoop.yarn.api.records.Priority;
import org.apache.hadoop.yarn.api.records.Resource;
import org.apache.hadoop.yarn.client.api.AMRMClient.ContainerRequest;
import org.apache.hadoop.yarn.client.api.async.AMRMClientAsync;
import org.apache.hadoop.yarn.client.api.async.NMClientAsync;
import org.apache.hadoop.yarn.client.api.async.impl.NMClientAsyncImpl;
import org.apache.hadoop.yarn.exceptions.YarnException;
import org.apache.hadoop.yarn.util.ConverterUtils;
public class ApplicationMaster {
private final AtomicInteger sleepSeconds = new AtomicInteger(0);
private class LaunchContainerTask implements Runnable {
Container container;
public LaunchContainerTask(Container container) {
this.container = container;
}
public void run() {
List<String> commands = new LinkedList<String>();
commands.add("sleep " + sleepSeconds.addAndGet(1));
ContainerLaunchContext ctx = ContainerLaunchContext.newInstance(
null, null, commands, null, null, null);
amNMClient.startContainerAsync(container, ctx);
}
}
private class RMCallbackHandler implements AMRMClientAsync.CallbackHandler {


public void onContainersCompleted(List<ContainerStatus> statuses) {
for (ContainerStatus status : statuses) {
LOG.info("Container Completed: " + status.getContainerId().toString()
+ " exitStatus="+ status.getExitStatus());
if (status.getExitStatus() != 0) {
// restart
}
ContainerId id = status.getContainerId();
runningContainers.remove(id);
numCompletedConatiners.addAndGet(1);
}
}
public void onContainersAllocated(List<Container> containers) {
for (Container c : containers) {
LOG.info("Container Allocated"
+ ", id=" + c.getId()
+ ", containerNode=" + c.getNodeId());
exeService.submit(new LaunchContainerTask(c));
runningContainers.put(c.getId(), c);
}
}
public void onShutdownRequest() {
}
public void onNodesUpdated(List<NodeReport> updatedNodes) {
}
public float getProgress() {
float progress = 0;
return progress;
}
public void onError(Throwable e) {
amRMClient.stop();
}
}
private class NMCallbackHandler implements NMClientAsync.CallbackHandler {
public void onContainerStarted(ContainerId containerId,
Map<String, ByteBuffer> allServiceResponse) {
LOG.info("Container Stared " + containerId.toString());
}
public void onContainerStatusReceived(ContainerId containerId,
ContainerStatus containerStatus) {
}
public void onContainerStopped(ContainerId containerId) {
// TODO Auto-generated method stub
}
public void onStartContainerError(ContainerId containerId, Throwable t) {
// TODO Auto-generated method stub
}
public void onGetContainerStatusError(ContainerId containerId,
Throwable t) {
// TODO Auto-generated method stub
}
public void onStopContainerError(ContainerId containerId, Throwable t) {
// TODO Auto-generated method stub
}
}

@SuppressWarnings("rawtypes")
AMRMClientAsync amRMClient = null;
NMClientAsyncImpl amNMClient = null;

AtomicInteger numTotalContainers = new AtomicInteger(10);
AtomicInteger numCompletedConatiners = new AtomicInteger(0);
ExecutorService exeService = Executors.newCachedThreadPool();
Map<ContainerId, Container> runningContainers = new ConcurrentHashMap<ContainerId, Container>();

private static final Log LOG = LogFactory.getLog(ApplicationMaster.class);
@SuppressWarnings("unchecked")
void run() throws YarnException, IOException {
Configuration conf = new Configuration();


// 1. create amRMClient
amRMClient = AMRMClientAsync.createAMRMClientAsync(
1000, new RMCallbackHandler());
amRMClient.init(conf);
amRMClient.start();

// 2. Create nmClientAsync
amNMClient = new NMClientAsyncImpl(new NMCallbackHandler());
amNMClient.init(conf);
amNMClient.start();


// 3. register with RM and this will heartbeating to RM
RegisterApplicationMasterResponse response = amRMClient
.registerApplicationMaster(NetUtils.getHostname(), -1, "");


// 4. Request containers
response.getContainersFromPreviousAttempts();
int numContainers = 10;
for (int i = 0; i < numTotalContainers.get(); i++) {
ContainerRequest containerAsk = new ContainerRequest(
//100*10M + 1vcpu
Resource.newInstance(100, 1), null, null,
Priority.newInstance(0));
amRMClient.addContainerRequest(containerAsk);
}
}

void waitComplete() throws YarnException, IOException{
while(numTotalContainers.get() != numCompletedConatiners.get()){
try{
Thread.sleep(1000);
LOG.info("waitComplete" +
", numTotalContainers=" + numTotalContainers.get() +
", numCompletedConatiners=" + numCompletedConatiners.get());
} catch (InterruptedException ex){}
}
LOG.info("ShutDown exeService Start");
exeService.shutdown();
LOG.info("ShutDown exeService Complete");
amNMClient.stop();
LOG.info("amNMClient stop Complete");
amRMClient.unregisterApplicationMaster(FinalApplicationStatus.SUCCEEDED, "dummy Message", null);
LOG.info("unregisterApplicationMaster Complete");
amRMClient.stop();
LOG.info("amRMClient stop Complete");
}
void logInformation() {
System.out.println("This is System.out.println");
System.err.println("This is System.err.println");
String containerIdStr = System
.getenv(ApplicationConstants.Environment.CONTAINER_ID.name());
LOG.info("containerIdStr " + containerIdStr);
ContainerId containerId = ConverterUtils.toContainerId(containerIdStr);
ApplicationAttemptId appAttemptId = containerId
.getApplicationAttemptId();
LOG.info("appAttemptId " + appAttemptId.toString());
}
public static void main(String[] args) throws Exception {
ApplicationMaster am = new ApplicationMaster();
am.run();
am.waitComplete();
}
}
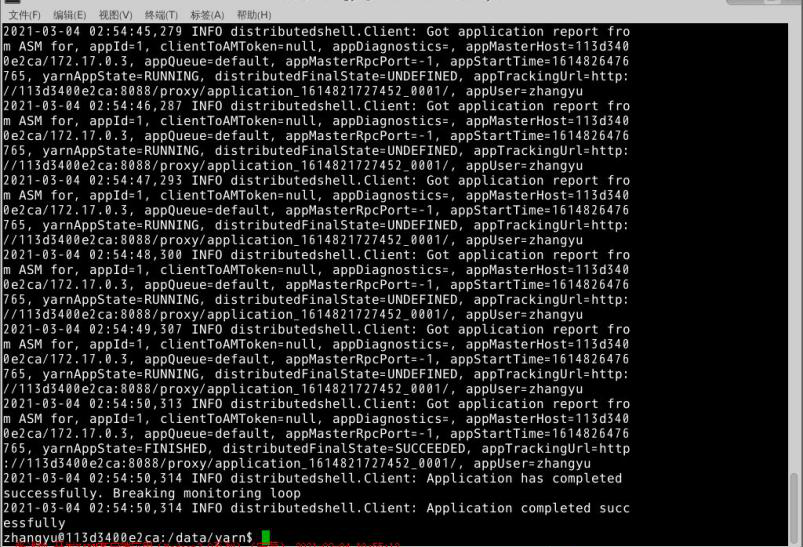
  1. 代码编写完成后,将整个YARN项目打包成jar包,

​ 在Linux的命令行,切换到/data/yarn目录下

1
cd /data/yarn 

​ 使用下面命令执行distributedshell。

1
2
3
4
5
6
7
8
9
hadoop org.apache.hadoop.yarn.applications.distributedshell.Client \ 

-jar hadoop-yarn-applications-distributedshell.jar \

-num_containers 10 \

-shell_command ls \

-priority 10

执行结果:

img

相关知识总结

  • MapReduce介绍

    MapReduce采用的是“分而治之”的思想,把对大规模数据集的操作,分发给一个主节点管理下的各个从节点共同完成,然后通过整合各个节点的中间结果,得到最终结果。简单来说,MapReduce就是”任务的分解与结果的汇总“。

    • MapReduce的工作原理

    ​ 在分布式计算中,MapReduce框架负责处理了并行编程里分布式存储、工作调度,负载均衡、容错处理以及网络通信等复杂问题,现在我们把处理过程高度抽象为Map与Reduce两个部分来进行阐述,其中Map部分负责把任务分解成多个子任务,Reduce部分负责把分解后多个子任务的处理结果汇总起来,具体设计思路如下。

    1. Map过程需要继承org.apache.hadoop.mapreduce包中Mapper类,并重写其map方法。通过在map方法中添加两句把key值和value值输出到控制台的代码,可以发现map方法中输入的value值存储的是文本文件中的一行(以回车符为行结束标记),而输入的key值存储的是该行的首字母相对于文本文件的首地址的偏移量。然后用StringTokenizer类将每一行拆分成为一个个的字段,把截取出需要的字段(本实验为买家id字段)设置为key,并将其作为map方法的结果输出。

    2. Reduce过程需要继承org.apache.hadoop.mapreduce包中Reducer类,并重写其reduce方法。Map过程输出的<key,value>键值对先经过shuffle过程把key值相同的所有value值聚集起来形成values,此时values是对应key字段的计数值所组成的列表,然后将<key,values>输入到reduce方法中,reduce方法只要遍历values并求和,即可得到某个单词的总次数。

    3. 在main()主函数中新建一个Job对象,由Job对象负责管理和运行MapReduce的一个计算任务,并通过Job的一些方法对任务的参数进行相关的设置。本实验是设置使用将继承Mapper的doMapper类完成Map过程中的处理和使用doReducer类完成Reduce过程中的处理。还设置了Map过程和Reduce过程的输出类型:key的类型为Text,value的类型为IntWritable。任务的输出和输入路径则由字符串指定,并由FileInputFormat和FileOutputFormat分别设定。完成相应任务的参数设定后,即可调用job.waitForCompletion()方法执行任务,其余的工作都交由MapReduce框架处理。

      • MapReduce框架的作业运行流程
    img
    • ResourceManager:是YARN资源控制框架的中心模块,负责集群中所有资源的统一管理和分配。它接收来自NM(NodeManager)的汇报,建立AM,并将资源派送给AM(ApplicationMaster)。

    • NodeManager:简称NM,NodeManager是ResourceManager在每台机器上的代理,负责容器管理,并监控他们的资源使用情况(cpu、内存、磁盘及网络等),以及向ResourceManager提供这些资源使用报告。

    • ApplicationMaster:以下简称AM。YARN中每个应用都会启动一个AM,负责向RM申请资源,请求NM启动Container,并告诉Container做什么事情。

    • Container:资源容器。YARN中所有的应用都是在Container之上运行的。AM也是在Container上运行的,不过AM的Container是RM申请的。Container是YARN中资源的抽象,它封装了某个节点上一定量的资源(CPU和内存两类资源)。Container由ApplicationMaster向ResourceManager申请的,由ResouceManager中的资源调度器异步分配给ApplicationMaster。Container的运行是由ApplicationMaster向资源所在的NodeManager发起的,Container运行时需提供内部执行的任务命令(可以是任何命令,比如java、Python、C++进程启动命令均可)以及该命令执行所需的环境变量和外部资源(比如词典文件、可执行文件、jar包等)。

    另外,一个应用程序所需的Container分为两大类,如下:

    • 运行ApplicationMaster的Container:这是由ResourceManager(向内部的资源调度器)申请和启动的,用户提交应用程序时,可指定唯一的ApplicationMaster所需的资源。
    • 运行各类任务的Container:这是由ApplicationMaster向ResourceManager申请的,并为了ApplicationMaster与NodeManager通信以启动的。

    以上两类Container可能在任意节点上,它们的位置通常而言是随机的,即ApplicationMaster可能与它管理的任务运行在一个节点上。


    • MapReduce将复杂的、运行于大规模集群上的并行计算过程高度地抽象到了两个函数:Map和Reduce
    • 编程容易,不需要掌握分布式并行编程细节,也可以很容易把自己的程序运行在分布式系统上,完成海量数据的计算
    • MapReduce采用“分而治之”策略,一个存储在分布式文件系统中的大规模数据集,会被切分成许多独立的分片(split),这些分片可以被多个Map任务并行处理
    • MapReduce设计的一个理念就是“计算向数据靠拢”,而不是“数据向计算靠拢”,因为,移动数据需要大量的网络传输开销
    • MapReduce框架采用了Master/Slave架构,包括一个Master和若干个Slave。Master上运行JobTracker,Slave上运行TaskTracker
    • Hadoop框架是用Java实现的,但是,MapReduce应用程序则不一定要用Java来写
  • MapReduce优势

传统并行计算框架 MapReduce
集群架构/容错性 共享式(共享内存/共享存储),容错性差 非共享式,容错性好
硬件/价格/扩展性 刀片服务器、高速网、SAN,价格贵,扩展性差 普通PC机,便宜,扩展性好
编程/学习难度 what-how,难 what,简单
适用场景 实时、细粒度计算、计算密集型 批处理、非实时、数据密集型
  • Map函数和Reduce函数
函数 输入 输出 说明
Map <*k*1,v1>如:<行号,”a b c”> List(<*k*2,*v*2>)如:<“a”,1><“b”,1><“c”,1> 1.将小数据集进一步解析成一批<key,value>对,输入Map函数中进行处理2.每一个输入的<*k*1,*v*1>会输出一批<*k*2,*v*2>。<*k*2,*v*2>是计算的中间结果
Reduce <*k*2,List(*v*2)>如:<“a”,<1,1,1>> <*k*3,*v*3><“a”,3> 输入的中间结果<k*2,List(v2)>中的List(v2)表示是一批属于同一个k*2的value
  • MapReduce体系结构主要由四个部分组成,分别是:Client、JobTracker、TaskTracker以及Task
    - Client
    用户编写的MapReduce程序通过Client提交到JobTracker端
    用户可通过Client提供的一些接口查看作业运行状态

    • JobTracker
      JobTracker负责资源监控和作业调度
      JobTracker 监控所有TaskTracker与Job的健康状况,一旦发现失败,就将相应的任务转移到其他节点
      JobTracker 会跟踪任务的执行进度、资源使用量等信息,并将这些信息告诉任务调度器(TaskScheduler),而调度器会在资源出现空闲时,选择合适的任务去使用这些资源
    • Client
      用户编写的MapReduce程序通过Client提交到JobTracker端
      用户可通过Client提供的一些接口查看作业运行状态
    • JobTracker
      JobTracker负责资源监控和作业调度
      JobTracker 监控所有TaskTracker与Job的健康状况,一旦发现失败,就将相应的任务转移到其他节点
      JobTracker 会跟踪任务的执行进度、资源使用量等信息,并将这些信息告诉任务调度器(TaskScheduler),而调度器会在资源出现空闲时,选择合适的任务去使用这些资源
  • MapReduce工作流程

    1. 不同的Map任务之间不会进行通信

    2. 不同的Reduce任务之间也不会发生任何信息交换

    3. 用户不能显式地从一台机器向另一台机器发送消息

    4. 所有的数据交换都是通过MapReduce框架自身去实现的

    5. MapReduce执行的全过程包括以下几个主要阶段:

      • 从分布式文件系统读入数据

      • 执行Map任务输出中间结果

      • 通过 Shuffle阶段把中间结果分区排序整理后发送给Reduce任务

      • 执行Reduce任务得到最终结果并写入分布式文件系统。

    MapReduce具有广泛的应用,比如关系代数运算、分组与聚合运算、矩阵-向量乘法、矩阵乘法等。


    Woooohhhhhh! Finally!!!


Hadoop基本操作
https://www.prime.org.cn/2021/03/09/Hadoop基本操作/
Author
emroy
Posted on
March 9, 2021
Licensed under